Introduction
Building Micronaut microservices using MicrostarterCLI is a fantastic way to create powerful and flexible applications. If you’re new to this, don’t worry! This guide will walk you through the basics of building microservices with Micronaut and how MicrostarterCLI makes the process easier.
Micronaut is a modern tool that helps developers build applications that are fast and easy to manage. When you combine it with MicrostarterCLI, setting up your project becomes a breeze. We’ll go step-by-step to show you how to get started and make your development journey smooth and enjoyable.
Introduction to Building Micronaut Microservices Using MicrostarterCLI
Building Micronaut microservices using MicrostarterCLI can seem like a big task, but it’s actually quite straightforward. Micronaut is a tool that helps you create small, independent parts of a big application, known as microservices. MicrostarterCLI is a handy tool that helps you get started quickly by setting up these projects for you.
If you’re new to these concepts, don’t worry! This guide will explain each step simply. We will start with the basics of what Micronaut and MicrostarterCLI are and how they work together. By the end of this guide, you’ll be ready to start building your own microservices with ease.
The goal of using Micronaut with MicrostarterCLI is to make your development process faster and more efficient. With these tools, you can create, test, and manage small pieces of your application quickly. This approach makes it easier to develop and maintain large applications.
Why Choose Micronaut for Microservices?
When you are building Micronaut microservices using MicrostarterCLI, you might wonder why Micronaut is a good choice. Micronaut is designed to be fast and lightweight, which is perfect for microservices. It starts up quickly and uses less memory, so your applications run smoothly.
Another great feature of Micronaut is its support for reactive programming. This means it can handle many requests at once without slowing down. This is especially useful when you need to build applications that can handle lots of users or data.
Micronaut also comes with built-in tools for dependency injection, which helps manage how different parts of your application work together. This makes your code easier to understand and manage. All these features make Micronaut a strong choice for building modern microservices.
Getting Started: What You Need for Building Micronaut Microservices Using MicrostarterCLI
Before you dive into building Micronaut microservices using MicrostarterCLI, you need to set up your development environment. First, make sure you have the Java Development Kit (JDK) installed. You need JDK version 11 or higher to work with Micronaut.
Next, you should install Micronaut and MicrostarterCLI. Micronaut is the framework you’ll use to build your microservices, while MicrostarterCLI will help you set up your project. Make sure your computer’s environment variables are set up correctly so that these tools can work together smoothly.
Once you have these tools installed, you’re ready to start building. Having the right setup will ensure that everything runs smoothly as you create and manage your microservices.
How to Install MicrostarterCLI for Micronaut Projects
Installing MicrostarterCLI for Micronaut projects is a simple process. First, download the latest version of MicrostarterCLI from its official GitHub page. This tool will help you quickly create and manage Micronaut projects.
After downloading, unzip the file to a directory on your computer. Next, you need to add the MicrostarterCLI bin directory to your system’s PATH. This allows you to run the tool from anywhere in your terminal.
Finally, check that MicrostarterCLI is installed correctly by running the command microstartercli --version in your terminal. If everything is set up right, you’ll see the version number displayed. Now, you’re ready to use MicrostarterCLI to start building your Micronaut microservices.
Creating Your First Micronaut Microservice Using MicrostarterCLI
Creating your first Micronaut microservice using MicrostarterCLI is easy. Start by running the command to initialize a new project. For example, you might use microstartercli create-app my-microservice --build=gradle --features=graalvm to set up a new project with Gradle and GraalVM support.
Once your project is set up, navigate to the project directory. Here, you can use MicrostarterCLI to generate essential parts of your microservice, like controllers and services. Commands like microstartercli generate-controller MyController and microstartercli generate-service MyService will help you get started.
With these steps, you’ll have a basic structure for your microservice ready to go. You can then customize and expand your service as needed, using Micronaut’s features to build a robust application.
Configuring Your Micronaut Microservice: Easy Steps
Configuring your Micronaut microservice is a crucial step after setting up your project. First, you’ll need to adjust the application.yml file to include settings specific to your application. This file is where you define important properties like server settings and application details.
Next, if your microservice needs to connect to a database, you’ll need to set up those connections in your configuration files. Make sure to add the necessary details like database URL and credentials.
Finally, configure logging by editing the logback.xml file. This file lets you set the logging levels and formats, helping you monitor your application’s behavior and troubleshoot issues effectively. Proper configuration ensures that your microservice runs smoothly and is easy to manage.
Developing Your Microservice with Micronaut and MicrostarterCLI
Developing your microservice with Micronaut and MicrostarterCLI involves writing the code for your service logic and endpoints. Start by opening the MyService.java file and implementing the core functionality of your service. For example, you might write a method that returns a greeting message.
Next, create your controller by editing the MyController.java file. The controller handles incoming requests and uses the service you developed. You can define endpoints that respond to requests and use the service to generate responses.
Adding unit tests is also important. Write tests to ensure that your service and controller work as expected. Testing helps catch bugs early and makes sure your code behaves correctly. With these steps, you’ll have a working and testable microservice ready for further development.
Building and Running Your Micronaut Microservice: A Simple Guide
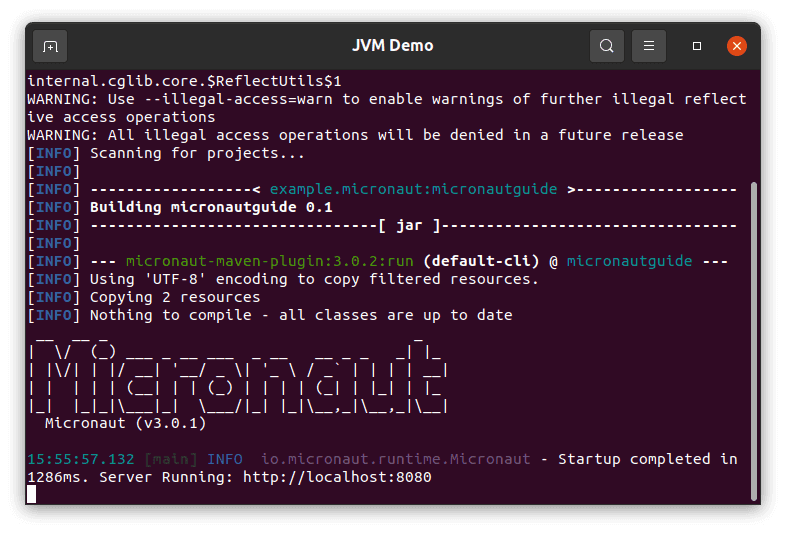
Once your microservice is developed, you need to build and run it. Start by building the project using the Gradle command ./gradlew build. This compiles your code and prepares it for execution.
After building, run the application with the command ./gradlew run. This starts your microservice, and you can check that it’s working by navigating to http://localhost:8080/api/greet in your web browser. You should see the greeting message if everything is set up correctly.
This process allows you to see your microservice in action and verify that it’s functioning as expected. Building and running your microservice is a crucial step in the development process, ensuring that your application works as intended.
Deploying Micronaut Microservices Using MicrostarterCLI
Deploying Micronaut microservices using MicrostarterCLI involves creating a Docker container for your application. Start by writing a Dockerfile that specifies how to build the Docker image for your microservice. This file will include instructions for copying your JAR file into the image and setting up the command to run it.
Next, build the Docker image with the command docker build -t my-microservice:latest .. This command creates an image that you can run on any Docker-compatible platform. After building, you can start a Docker container using docker run -p 8080:8080 my-microservice:latest.
Optionally, you can push the image to Docker Hub by tagging it and using docker push. This step makes your image available for deployment on other servers or cloud platforms. With these steps, your microservice is ready for deployment and use in different environments.
Monitoring Your Micronaut Microservice: Tools and Tips
Monitoring your Micronaut microservice is essential for keeping track of its performance. Start by integrating tools like Prometheus into your application. Add the micronaut-prometheus dependency to collect and expose metrics about your microservice.
Prometheus will gather data about your service’s performance, which you can visualize using Grafana. Grafana provides dashboards and charts to help you understand how your microservice is performing and identify any issues.
Additionally, consider setting up logging with tools like the ELK Stack (Elasticsearch, Logstash, Kibana) to keep track of logs and errors. Effective monitoring and logging ensure that your microservice runs smoothly and helps you address any problems quickly.
Scaling Your Microservices: Best Practices with Micronaut
Scaling your microservices is important to handle increased load and traffic. Micronaut supports scaling by integrating with tools like Kubernetes. Start by creating Kubernetes deployment files that define how your microservice should be deployed and managed in a Kubernetes cluster.
Use Kubernetes Horizontal Pod Autoscaler (HPA) to automatically adjust the number of running instances based on CPU usage. This helps ensure that your microservice can handle more traffic when needed without manual intervention.
Proper scaling practices help maintain the performance and reliability of your microservices. By leveraging Kubernetes and Micronaut’s features, you can efficiently scale your applications to meet the demands of your users.
Troubleshooting Common Issues in Building Micronaut Microservices Using MicrostarterCLI
When building Micronaut microservices using MicrostarterCLI, you might run into some common issues. One frequent problem is incorrect configuration settings. Make sure your application.yml and other configuration files are properly set up to avoid issues.
Another common issue is dependency problems. Ensure that all required dependencies are included in your project and that they are compatible with each other. Missing or incompatible dependencies can cause errors during build or runtime.
If you encounter any problems, check the logs and error messages for clues. The logs can help you identify what went wrong and guide you in fixing the issue. With these troubleshooting tips, you can resolve problems and keep your microservices running smoothly.
Conclusion
Building Micronaut microservices using MicrostarterCLI is a great way to create powerful and efficient applications. By following the steps in this guide, you can quickly set up, develop, and deploy your microservices. Micronaut helps you make fast and lightweight applications, while MicrostarterCLI makes starting new projects a breeze.
With the right tools and practices, you can manage and scale your microservices easily. Remember, Micronaut and MicrostarterCLI work together to make your development process smoother. So, dive in and start building your own microservices today—it’s easier than you might think!
Read More: Retro Bowl 3KH0: A Fun Mix of Retro Gaming and Football Strategy